Zed Editor Setup Guide
A high-performance code editor with built-in AI assistant support. Connect it to Xiaomai API and start using it.
Website: https://zed.dev | Download: https://zed.dev/download
Overview
Zed is a high-performance code editor written in Rust. It includes an AI Agent panel and inline assistant. Zed supports Anthropic and OpenAI providers natively. By changing the API address to Xiaomai API, you can use Claude and GPT-series models directly.
Supported Environment
- Windows: supported
- macOS: supported
- Linux: supported
Features
- Agent panel: AI can read and write files, run terminal commands, and search code
- Inline assistant: select code, describe the task, and let AI rewrite it in place
- Model switching: switch models by task
- MCP extensions: extend AI capabilities through MCP servers
- High performance: Rust-based editor with fast startup and low resource usage
Install Zed
- Open the Zed download page
- Download the version for your system:
- macOS: download the
.dmgfile and drag it into Applications - Linux: run the official installer:
- macOS: download the
curl -fsSL https://zed.dev/install.sh | sh- Open Zed after installation
Get a Xiaomai API Key
Prepare an API key before configuration:
- Sign in to the Xiaomai API console
- Create a new key and choose the auto token group
- Copy and save the key, such as
sk-xxxx
Tip
If you do not have an account, register first, then create a key.
Configure Xiaomai API as the Anthropic Provider
Important Order
Write the settings.json configuration first, save it, and then enter the API key. Zed stores API keys in system secure credentials instead of the config file. After editing settings.json, the provider UI may refresh and the key field may look empty, so entering the key last is simpler.
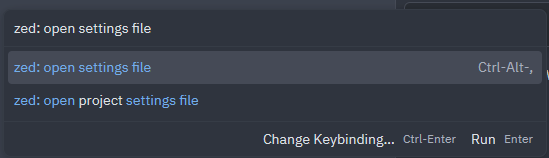
Step 1: Open the Settings File
Press Ctrl + Alt + ,, or open the command palette and run zed: open settings file.
Step 2: Add the Anthropic API URL
Add this configuration to settings.json:
{
  "language_models": {
    "anthropic": {
      "api_url": "https://xiaomai.win"
    }
  }
}
Note
If your settings.json already has other settings, merge the language_models section into the existing object instead of duplicating outer braces.
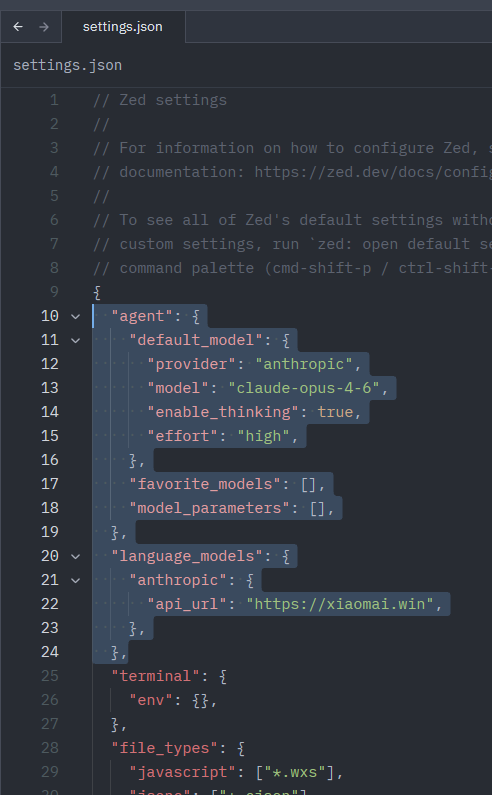
To configure a default model and extended thinking, add the agent section:
{
  "agent": {
    "default_model": {
      "provider": "anthropic",
      "model": "claude-opus-4-6",
      "enable_thinking": true,
      "effort": "high"
    }
  },
  "language_models": {
    "anthropic": {
      "api_url": "https://xiaomai.win"
    }
  }
}
After saving, it should look like this:
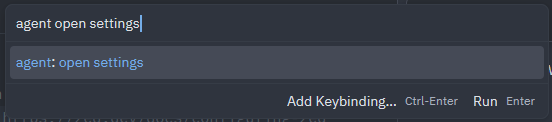
Step 3: Enter the API Key
After saving settings.json, open the command palette and run agent: open settings.
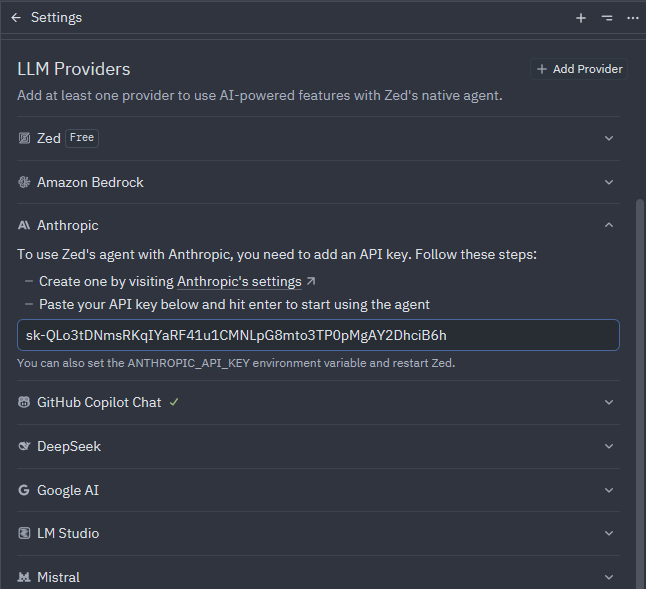
In the LLM Providers list, expand Anthropic, paste your Xiaomai API key into the input, and press Enter to save.
Step 4: Verify
After configuration succeeds, Anthropic shows a green check and API key configured for https://xiaomai.win.
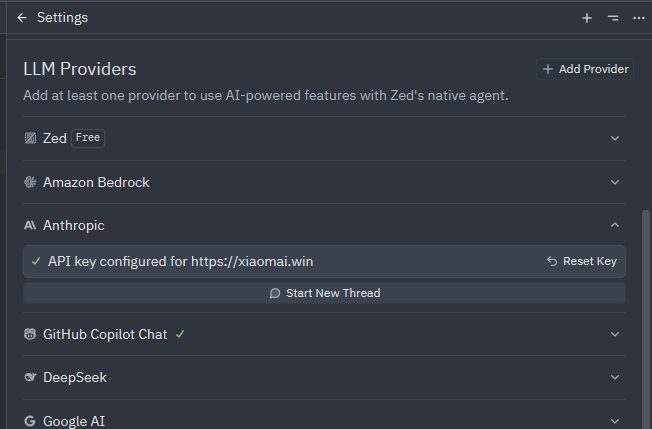
Click Start New Thread and send hi. If you receive a response, everything is working.
Configure Xiaomai API as the OpenAI Provider
You can also use Zed's built-in openai provider to access GPT-series models.
Why openai Instead of openai_compatible?
openai_compatible is intended for third-party compatible services, such as local models or other gateways. For GPT models through Xiaomai API, the built-in openai provider is enough.
Token Group Requirement
When using OpenAI models, the key's token group must include codex-team, otherwise GPT-series models cannot be called.
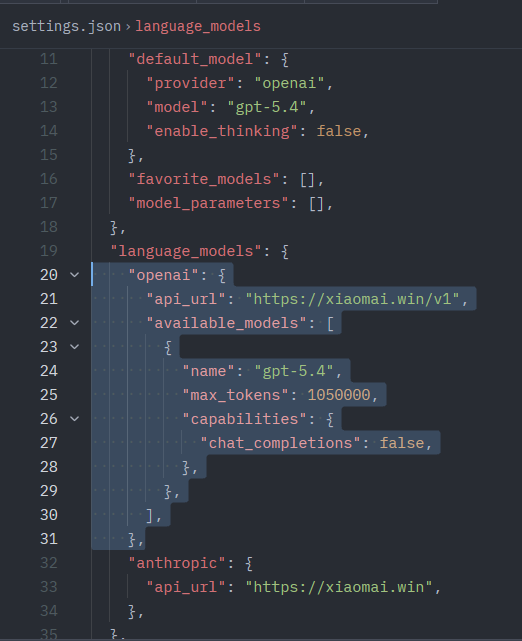
Step 1: Edit settings.json
Add openai configuration under language_models. Declare models manually and set chat_completions: false to use the newer OpenAI Responses API:
{
  "language_models": {
    "openai": {
      "api_url": "https://xiaomai.win/v1",
      "available_models": [
        {
          "name": "gpt-5.4",
          "max_tokens": 1050000,
          "capabilities": {
            "chat_completions": false
          }
        }
      ]
    }
  }
}
About chat_completions
chat_completions: falseuses the newer OpenAI Responses API and is recommended- Missing or
trueuses the older Chat Completions API
Example:
Step 2: Enter the API Key
Open LLM Providers through agent: open settings, expand OpenAI, enter your Xiaomai API key, and press Enter.
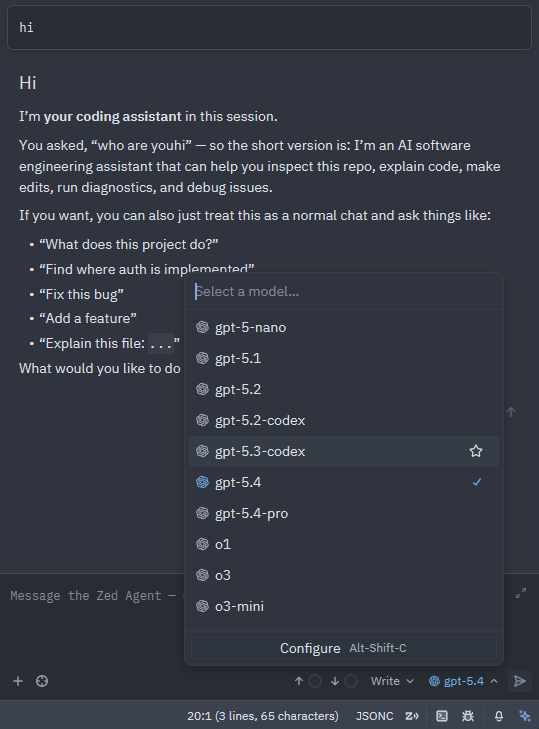
Step 3: Verify
The Agent panel model dropdown should show GPT-series models. Select gpt-5.4 and test it.
Full Configuration Example
If you use both Anthropic and OpenAI providers, this is a full settings.json example:
{
  "agent": {
    "default_model": {
      "provider": "openai",
      "model": "gpt-5.4"
    }
  },
  "language_models": {
    "anthropic": {
      "api_url": "https://xiaomai.win"
    },
    "openai": {
      "api_url": "https://xiaomai.win/v1",
      "available_models": [
        {
          "name": "gpt-5.4",
          "max_tokens": 1050000,
          "capabilities": {
            "chat_completions": false
          }
        }
      ]
    }
  }
}
API URL Difference
- Anthropic provider:
https://xiaomai.win, without/v1 - OpenAI provider:
https://xiaomai.win/v1, with/v1
The two provider URL formats are different.
Usage
Agent Panel
The Agent panel is Zed's core AI feature. It can:
- Read and edit project files
- Run terminal commands
- Search the codebase
- Complete complex tasks through multi-turn conversations
Shortcut: Cmd/Ctrl + Shift + P -> agent: toggle
Inline Assistant
Select code, press Ctrl + Enter, and describe your request. AI rewrites the selected code in place. This is useful for quick refactors, comments, and bug fixes.
FAQ
401 or 403 Error
- API key is incorrect. Copy and paste it again
- Balance is insufficient. Go to top up
No Models Available
Fully restart Zed after saving settings.json.
Request Failed
- Check whether your network can access
https://xiaomai.win - Anthropic provider
api_urlshould behttps://xiaomai.win, without/v1 - OpenAI provider
api_urlshould behttps://xiaomai.win/v1, with/v1